


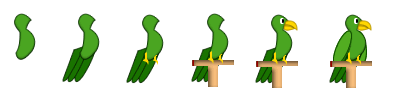
This tutorial teaches how to create the animated graphic as shown below. Animated graphics add an exciting, stylish look to your website. In Adobe Fireworks CS4, you can create animated graphics for banner ads, logos, and cartoons that move.
Color Palette - Parrot
#4AA521#197300#FFD600#B59400#8B1A11#E4AE71#000000#BE1328
Follow these 3 simple steps and your Animated GIF will be ready in a jiffy!
Step 1: Create all the Graphics your Animation needs
- Open Fireworks and create a new file of size 100x100 pixels.
- Draw a parrot of your own using pen tool
 and ellipse tool
  in Fireworks. See the illustration below that shows how to draw a parrot.
Step 2: Creating the Frames of the Animated Graphic
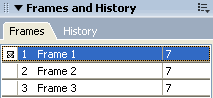
In custom animation we need to setup the animation by creating each movement or step of the animation in separate frames. For this, we need to first place graphics that should appear simultaneously in layers and give each layer a relevant name. Next, graphics that should appear in more than one frame needs to be shared across frames by ticking the "share across frames" property when the layer is double clicked. A icon will appear next to the layer name. Frame 1 of our animation will appear as below:Now, let's create Frame 2 of our animation:
Frame 1

- Open Frames panel (Window >> Frames or press (Shift+F2)), by default frame 1 appears.
- Click options icon in the top right of frames panel and select duplicate frame. A Duplicate frame dialog box will appear. In that dialog box enter the number of frames you need and select "after current frame" option then click ok. Your additional frames are now created. The image below shows how the frames panel will appears after we added just 2 frames for our animation.
- Now click on Frame 2 to select it and adjust the mouth of the parrot using the subselection tool
 .
. - The image below describes the steps to change the first frame graphic to our modified parrot graphic for the second frame.
- Now click on Frame 3 and write any text (as you like).
- The image below describes the steps to change the second frame graphic to our modified parrot graphic for the third frame.
Frame 2 of our animation will appear as below:

Now, let's create Frame 3 of our animation:Frame 2
Frame 3
Step 3: Settings, Preview and Exporting the Animated GIF
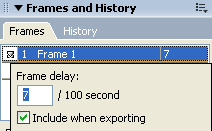
- Now you need to set the frame rate, by default 7 per 100 delays appears. If you want to slow the rate, select all the frames by pressing shift tab and double click the frames, frame rate delay box will appear, set it to say 35. See the picture below that will show that how the frame rate will appears.
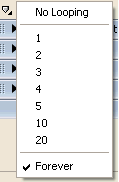
- And below the frames panel, select loop setting
 , and select forever if you want your animation to be continuous. See the picture below that will show how to select forever option from the drop down list.
 - You can preview the animation in the Preview panel. To do this, click the white arrow
 which is displayed in the bottom right of the document window (above the properties panel). See the picture below that will show you the play button.
 - On the Optimize panel (Window >> Optimize or press F6), select Animated GIF from drop down list (either the first or second drop down), check if the third drop down is set to Web Adaptive (if not select it) and select the number of Colors as 256. The Optimize panel will look as below:
- You can Preview the animation in any browser by Pressing F12.
- Export your file and save the resultant GIF file in separate folder. (www.smartwebby.com)

0 comments:
Post a Comment